Welcome to IDI Electronica!!!


Welcome!!! IDI Electronica is a blog for my personal projects and articles to help electronics enthusiasts like me.

Bienvenidos!!! IDI Electronica es un blog con mis proyectos personales y artículos con el fin de ayudar a entusiastas de la electrónica como yo.

Wednesday, July 23, 2014

What is Hysteresis?

If you have experience with digital designs, you have probably run into the term hysteresis (if not, you will).  Most likely, you looked it up online and most explanations were rather confusing. This occurs because the term hysteresis is used all over the place, such as mechanics, physics, biology and even economics.

Let's begin talking about digital logic. We use high and low voltage signals to represent a 1 and 0 binary system. The voltages are usually defined by some standard. For instance, TTL logic uses 0V and +5V for 0 and 1. Because of that, many people assume that electric signals in digital logic are exclusively high or low, like perfectly squared signals (see in figure 1).


Fig 1. Square wave representing digital 1's and 0's


In reality, signals take time to transition and depending on the circuit design, signals can overshoot, undershoot, oscillate and can also be affected by noise. Figure 2 shows a step response, a simple transition from 0 to 1, where we observe the signal overshooting past its target value by almost 40%, causing some oscillation as it reaches a steady-state.


Fig 2. Step response showing overshooting and oscillation


Digital devices use a threshold to decide if a signal becomes 0 or 1. However, when a rising signal is affected by noise or oscillation, it can end up crossing a thresholds multiple times (fig. 3). In the example, the input signal transitions from low to high. But, because of the noise, the signal ends up crossing the threshold multiple times and the circuit interprets it as a multiple transitions.


Fig 3. Digital signal with multiple transitions due to noise


So, what's hysteresis? It is a region around the threshold designed to ignore any transitions caused by a noisy signal or oscillations. In other words, it is a property that creates two separate thresholds for a digital signal (see fig. 4).

Additionally, if you don't pay attention to it, you could inadvertently create timing delays, and some unstable signals might could up crossing it.


Fig 4. Digital threshold showing hysteresis band


For an example, we can take a look at TTL logic (transistor-transistor logic). The output will usually transition to high, only when the input is between 2V to 5V. The gap between 0.8V and 2V would be our hysteresis and ff the signal oscillates, the output won't transition to low unless the input signal falls below 0.8V. .


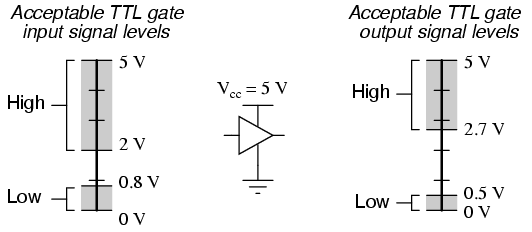
Fig 5. TTL signal levels


Tuesday, July 22, 2014

Interfacing SainSmart 20x4 LCD Module with Arduino Uno

This is a simple project to interface the 20x4 LCD Module by SainSmart using the Arduino Uno. I got my LCD module in Amazon, listed as SainSmart LCD Module For Arduino 20 X 4, PCB Board, White On Blue.

Based on customer reviews, the module may or may not come with a I2C module depending on which seller it comes from (mine was BeesClover). Also, the package may not include the datasheet and some components.  This LCD module can be considered cheap if you have Amazon Prime, since shipping would have added 40-50% to the cost.


Fig 1. SainSmart 20x4 LCD 

Fig 2. SainSmart 20x4 LCD 


Fig 3. I2C Adapter. The rotary knob controls the contrast.


Below are the instructions to test the LCD module with an I2C adapter:

1. Do an online search and download the Arduino library file LiquidCrystal_V1.2.1.zip. This file was developed by F. Malpartida and modifies the Arduino default LCD library to be compatible with the Hitachi HD44780 and compatible chipsets.

2. Replace the default LiquidCrystal Arduino library with the folder contained in the new file. You'll need a program like 7zip to decompress the ZIP file.

3. Connect the pins in the I2C adapter to the Arduino Uno, matching the 5V and GND pins on both boards, the SDA pin to A4 and SCL with A5.

Note: Pins vary for other Arduino boards. For Mega2560, use pins 20, 21; for Leonardo, pins 2, 3; for Due, pins 20, 21, SDA1, SCL1.

4. Find the I2C address for the module in the datasheet. Otherwise, use the I2cScanner library to find the address in your device.

5. Load the code sample below into the Arduino. The display should read "Hello World" in each row while turning on and off every second. Make sure that the address in #define I2C_ADDR matches the value in the datasheet.

#include <Wire.h>                // Loads I2C interface library
#include <LiquidCrystal_I2C.h>   // Loads LCD library for I2C

#define I2C_ADDR 0x27    // Set I2C device address


//Define pins in LCD controller for I2C interface. Don't change.
#define BACKLIGHT_PIN 3 
#define En_pin 2
#define Rw_pin 1
#define Rs_pin 0
#define D4_pin 4
#define D5_pin 5
#define D6_pin 6
#define D7_pin 7

LiquidCrystal_I2C lcd(I2C_ADDR,En_pin,Rw_pin,Rs_pin,D4_pin, D5_pin,D6_pin,D7_pin);

void setup()
{
lcd.begin (20,4,LCD_5x8DOTS);    //Define type of LCD display
lcd.setBacklightPin(BACKLIGHT_PIN,POSITIVE);
}


// Start LCD display loop
void loop()                 
{
lcd.setBacklight(HIGH);      // Turn on LCD backlight
lcd.clear();                 // Clear LCD characters
lcd.print("HELLO WORLD 1       "); // Print rows 1 through 4
lcd.print("HELLO WORLD 2       ");
lcd.print("HELLO WORLD 3       ");
lcd.print("HELLO WORLD 4       ");
delay(1000);                 // Wait 1000 ms (1 sec)
lcd.clear();                 // Clear LCD characters    
lcd.setBacklight(LOW);       // Turn off LCD backlight
delay(1000);                 // Wait 1000 ms (1 sec)
}

The file with this code can be downloaded from my repository https://github.com/sphanlung/Arduino under the name SainsmartLCD.ino

 Fig 4. Arduino interfacing with LCD

Fig 5. LCD displaying Hello World


Fig 6. Datasheet - Page 1


Fig 7. Datasheet - Page 2


Wednesday, July 16, 2014

Caracteres Especiales para Ingeniería Usando Tecla ALT

Si alguna vez tuviste que escribir un reporte de ingeniería, sabes lo irritante que es tipear operadores matemáticos y letras griegas usando un teclado estándar.

Afortunadamente, las PCs te permiten insertar algunos de esos caracteres presionando la tecla ALT e insertando una combinación de números. Abajo, puedes encontrar algunos de esos caracteres.


    Alt + 171  = ½                 Alt + 0216 = Ø

    Alt + 172  = ¼                 Alt + 224  = α

    Alt + 0190 = ¾                 Alt + 225  = ß

    Alt + 0178 = ²                 Alt + 227  = π

    Alt + 0179 = ³                 Alt + 228  = Σ

    Alt + 252  = ⁿ                 Alt + 229  = σ

    Alt + 0176 = °                 Alt + 231  = τ

                                   Alt + 232  = Φ

    Alt + 242  = ≥                 Alt + 233  = Θ

    Alt + 243  = ≤                 Alt + 234  = Ω

    Alt + 244  = ⌠                 Alt + 235  = δ

    Alt + 245  = ⌡                 Alt + 236  = ∞

    Alt + 246  = ÷                 Alt + 237  = φ

    Alt + 247  = ≈

    Alt + 251  = √                 Alt + 1    = ☺

    Alt + 240  = ≡

    Alt + 0177 = ±

Special Characters for Engineering Using ALT Key

If you ever had to write an engineering report, you know how irritating it can be to type math operators and Greek characters unavailable in a standard keyboard.

Fortunately, PCs allow you to insert some of these characters by pressing the ALT key and a combination of numbers. Below, you can find some of those characters.


    Alt + 171  = ½                 Alt + 0216 = Ø

    Alt + 172  = ¼                 Alt + 224  = α

    Alt + 0190 = ¾                 Alt + 225  = ß

    Alt + 0178 = ²                 Alt + 227  = π

    Alt + 0179 = ³                 Alt + 228  = Σ

    Alt + 252  = ⁿ                 Alt + 229  = σ

    Alt + 0176 = °                 Alt + 231  = τ

                                   Alt + 232  = Φ

    Alt + 242  = ≥                 Alt + 233  = Θ

    Alt + 243  = ≤                 Alt + 234  = Ω

    Alt + 244  = ⌠                 Alt + 235  = δ

    Alt + 245  = ⌡                 Alt + 236  = ∞

    Alt + 246  = ÷                 Alt + 237  = φ

    Alt + 247  = ≈

    Alt + 251  = √                 Alt + 1    = ☺

    Alt + 240  = ≡

    Alt + 0177 = ±

Thursday, July 3, 2014

Arduino UNO - Placa de Desarrollo

Arduino es una plataforma de electrónica abierta para la creación de prototipos basada en software y hardware flexibles y fáciles de usar. Se creó para artistas, diseñadores, aficionados y cualquiera interesado en crear entornos u objetos interactivos.
El Arduino se ha convertido en una de las plataformas de microcontroladores más populares entre los aficionados y entusiastas de la electrónica en los últimos años.  A diferencia de la mayoría de plataformas de desarrollo, el ambiente de Arduino provee un lenguaje de programación y carga de fácil uso.

El Arduino UNO es una placa de desarrollo que incluye:

- Microcontrolador Atmel ATmega328
- 14 pines de entrada/salida digital (I/O)
- 6 entradas análogas
- Reloj de 16MHz
- 1 conector USB
- 2KB SRAM (parte del ATmega328)
- 1KB EEPROM (parte del ATmega328)
- 32KB Memoria Flash (parte del ATmega328)
- 1 LED de uso genérico
- 1 Botón de Reinicio

Para más información, pueden visitar la página de Arduino (inglés)


Arduino UNO Development Board

Arduino is an open-source physical computing platform based on a simple i/o board and a development environment that implements the Processing/Wiring language. Arduino can be used to develop stand-alone interactive objects or can be connected to software on your computer (e.g. Flash, Processing, MaxMSP). The open-source IDE can be downloaded for free (currently for Mac OS X, Windows, and Linux).

The Arduino microcontroller platform has become very popular in the past years amongst electronic enthusiasts and hobbyists. Unlike other microcontroller development tools, the Arduino environment provides a very user friendly programming language and upload tool.

The Arduino UNO is a development board that features:

- Atmel ATmega328 microcontroller
- 14 digital input/output pins
- 6 analog inputs
- 16MHz clock
- 1 USB connector
- 2KB SRAM (included in ATmega328)
- 1KB EEPROM (included in ATmega328)
- 32KB Flash Memory (included in ATmega328)
- 1 On-board LED
- 1 Reset Button

For more information you can visit Arduino's website


Table of Contents / Tabla de Contenidos

English

Mojo v2 FPGA Development Board - Development board, FPGA, microcontroller 

Finite State-Machine using Button Toggle - FPGA, verilog

Finite State-Machines changing LED automatically - FPGA, verilog

Clock Frequency Divider - FPGA, verilog

Arduino UNO Development Board - Development board, microcontroller

Special Characters for Engineering Using ALT Key

Interfacing SainSmart 20x4 LCD Module with Arduino Uno - microcontroller

What is Hysteresis and Why Care About It? - theory

Trying to Keep Track of Your Code? Try GitHub - programming

LED Circuit Design - theory

Blinking an LED Using the Tiva C Series LaunchPad and Keil µVision - dev board, microcontroller

Microprocessor vs Microcontroller vs FPGA - theory

How to Make an Ethernet Cable Without a Crimping Tool - DIY, networking

Myths About Electricity - theory

Creating a Project with the Terasic DE0-Nano FPGA Development Board - verilog, FPGA, dev board

Driving Single Digit 7-Segment Display with the Tiva C Series Launchpad - microcontroller

Button Press Counter Using 4-Digit 7-Segment Display and Tiva C Launchpad - microcontroller

Frequency Divider by Odd Numbers with 50% Duty Cycle - theory, verilog


Español

Mojo v2 Placa de Desarrollo de FPGA - Placa de desarrollo, FPGA, microcontrolador

Máquina de Estado Finita - Usando Botón para Cambios - FPGA, verilog

Máquina de Estado Finita - Cambiando LEDs Automáticamente - FPGA, verilog

Divisor de Frecuencia de Reloj - FPGA, verilog

Arduino UNO Placa de Desarrollo - placa de desarrollo, microcontrolador

Interfaz entre Módulo de LCD SainSmart de 20x4 con Arduino Uno - microcontrolador

Caracteres Especiales para Ingeniería Usando Tecla ALT

Qué es la Histéresis? - teoría

Estás Tratando de Organizar tu Código? Prueba GitHub - programación

Diseñando un Circuito con LEDs - teoría

Parpadeando un LED con el Tiva C Series LaunchPad y Keil µVision v4 - microcontrolador, placa de desarrollo

Microprocesadores vs Microcontroladores vs FPGAteoría

Cómo Hacer un Cable de Ethernet Sin Crimpadora o Pinza de Compresión? - DIY, networking

Mitos e Ideas Erróneas Sobre la Electricidad - theory

Creación de Proyecto con la Placa de Desarrollo de FPGA Terasic DE0-Nano - verilog, FPGA, dev board

Control de Pantalla de Siete Segmentos con el Tiva C Launchpad - microcontrolador

Contador de Presión de Botón con Pantalla de 7 Segmentos y 4 Dígitos y el Tiva C Launchpad - microcontrolador

Divisor de Frecuencia por Número Impar con Ciclo de Trabajo de 50% - verilog, teoría